
How to Change Screen Resolution in Windows 10 (Complete Beginner’s Guide)
Changing screen resolution in Windows 10 is easy once you know where to look. Whether you want sharper text, better scaling, or to fix display issues, this step-by-step guide walks you through every method.
Estimated reading time: 7–9 minutes
What Is Screen Resolution?
Screen resolution refers to the number of pixels displayed on your screen horizontally and vertically. It’s written in the format width × height, such as 1920 × 1080.
A higher resolution means more pixels, resulting in sharper images and clearer text. A lower resolution means fewer pixels, which can make everything appear larger but less sharp.
Windows 10 automatically selects a resolution that works best with your monitor, known as the recommended resolution. However, you may want to change it for performance, readability, or troubleshooting reasons.
Why You Might Need to Change Screen Resolution
- Text or icons appear too small or too large
- Blurry or stretched display
- External monitor not displaying correctly
- Games or apps require a specific resolution
- Fixing display issues after driver updates
Whatever the reason, Windows 10 gives you several ways to adjust display resolution safely.
Quick Tips Before You Start
- Always try the recommended resolution first
- Windows will revert automatically if the screen becomes unusable
- Resolution changes don’t damage your monitor
- You may need updated graphics drivers to see all options
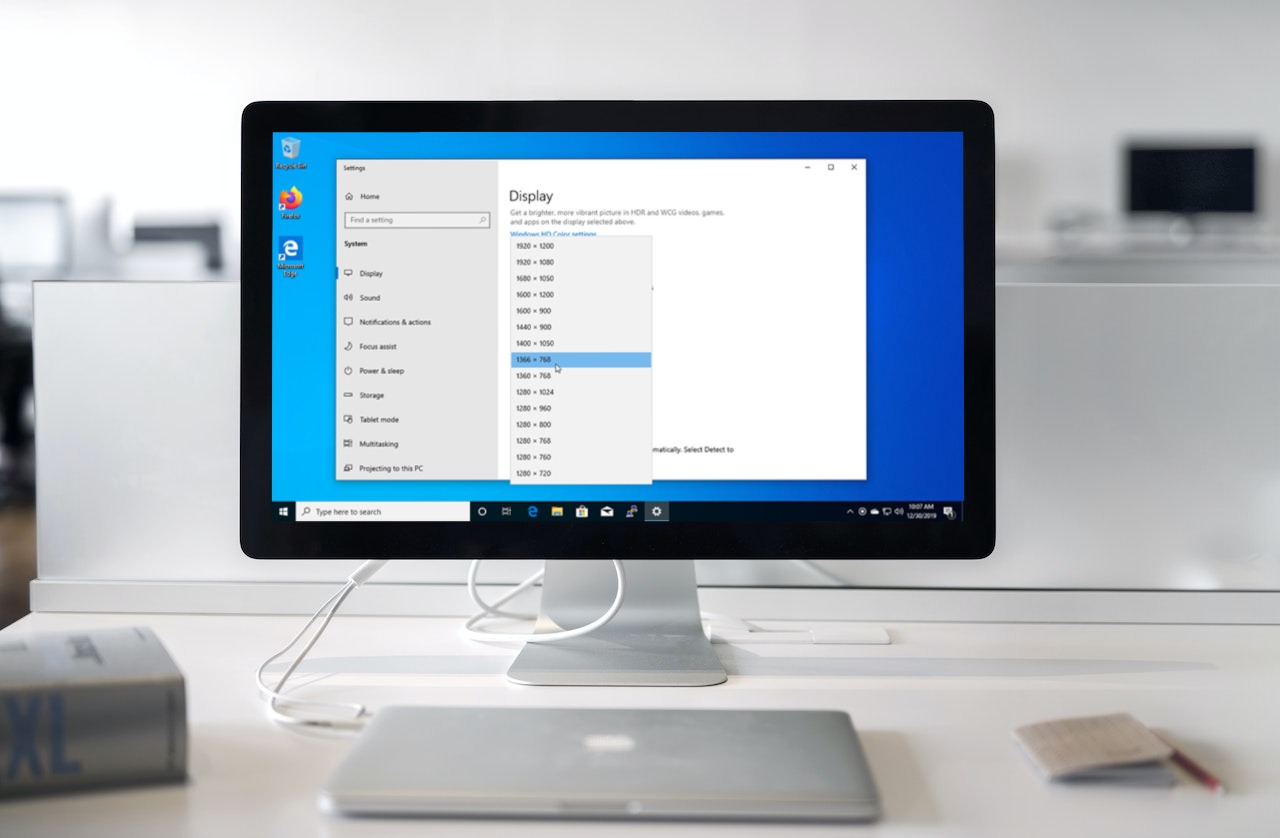
Method 1: Change Screen Resolution Using Display Settings
This is the easiest and most common method to change screen resolution in Windows 10.
- Right-click on an empty area of the desktop
- Select Display settings
- Scroll down to the Display resolution section
- Click the drop-down menu
- Select your desired resolution
Windows will show a preview and ask whether you want to keep the new resolution.
- Click Keep changes if it looks good
- If you don’t respond within 15 seconds, Windows will revert automatically
Method 2: Using Graphics Control Panel
Some systems provide quick access to graphics settings through a right-click menu.
- Right-click on the desktop
- Select Graphics Properties or Graphics Options
- Navigate to Display or Resolution
- Choose a new resolution and apply
This method depends on your graphics hardware and driver version.
Method 3: Using Graphics Driver Software
If your PC has a dedicated graphics card, you likely have manufacturer software installed.
Common tools include:
- NVIDIA Control Panel
- AMD Radeon Software
- Intel Graphics Command Center
- Open the graphics software from Start or system tray
- Go to display or screen settings
- Select your preferred resolution
- Apply the changes
Understanding Recommended Resolution
The recommended resolution matches your monitor’s native pixel layout.
Using non-native resolutions may cause:
- Blurry text
- Stretched images
- Black borders
For best visual quality, always choose the resolution marked as (Recommended).
Troubleshooting Resolution Problems
- Update your graphics drivers
- Restart your PC after changes
- Check monitor cable connections
- Use correct refresh rate settings
- Try Safe Mode if the screen goes blank
Frequently Asked Questions
Q: Why can’t I see higher resolutions?
A: Your graphics driver may be outdated or your monitor doesn’t support them.
Q: Will changing resolution harm my PC?
A: No. Windows safely handles resolution changes.
Q: Why does everything look small at high resolution?
A: You may need to adjust Display Scaling instead of resolution.
Final Thoughts
Changing screen resolution in Windows 10 is a simple but powerful way to improve visual clarity, fix display problems, and customize your viewing experience.
If you experience issues, revert to the recommended resolution or update your graphics drivers. With the steps above, you can confidently adjust your display without fear.